
Free No-Sew Bunny Amigurumi Pattern (Easy Crochet)
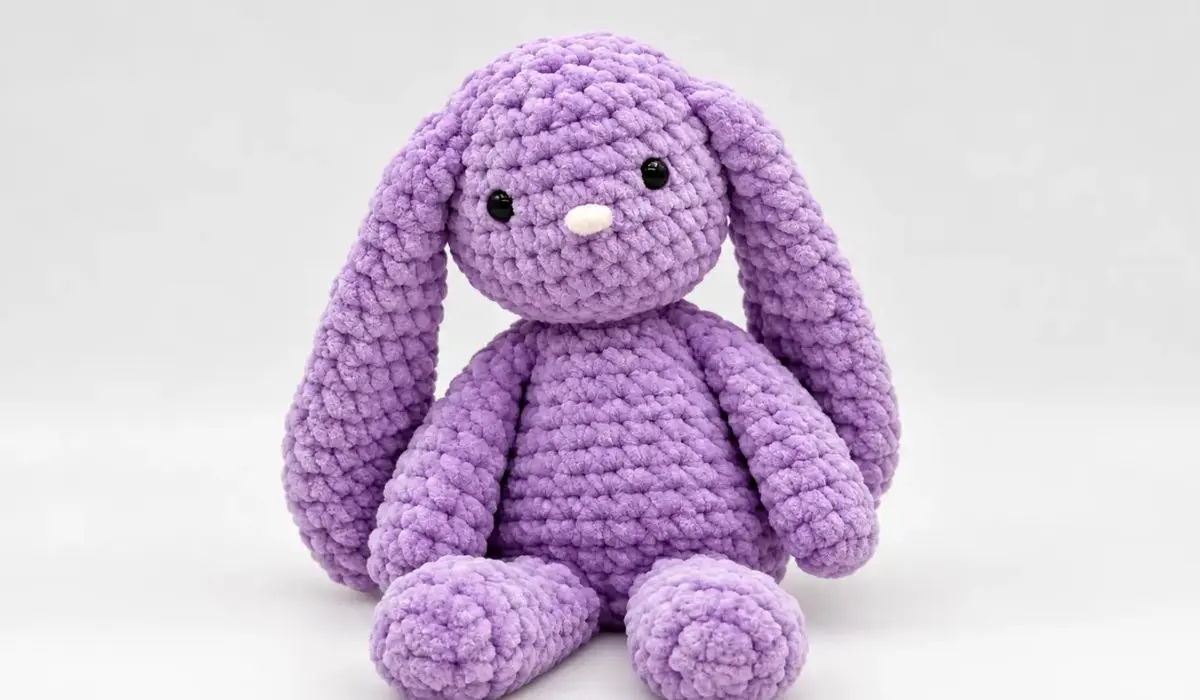
Looking for a cute and cuddly no-sew bunny amigurumi pattern? This adorable crochet bunny features long, floppy ears, a soft chenille body, and sweet little details that make it perfect for handmade gifts, Easter decorations, or your next crochet project.
This no-sew crochet bunny uses a join-as-you-go technique to attach the legs, arms, and ears as you work, reducing the need to sew separate pieces together. The pattern combines basic crochet stitches with a few joining techniques that require extra attention.
In this guide, you’ll discover the materials, helpful crochet tips, and step-by-step construction details for making this plush bunny.
Why You’ll Love This No-Sew Crochet Bunny
This no-sew crochet bunny combines soft, cuddly texture with an adorable design that’s hard to resist. Its long, gently curved ears, round body, and tiny fluffy tail give it a charming handmade look.
One of the best features of this bunny is the join-as-you-go construction. Instead of sewing the arms, legs, and ears onto the finished toy, you’ll attach them directly while crocheting the body and head.
The pattern uses familiar stitches such as single crochet, increases, and decreases. The joining steps require a little extra attention, but the result is a sweet plush bunny with fewer separate pieces to assemble.
Materials You’ll Need
To make this soft and cuddly bunny, you’ll need super bulky chenille yarn and a few basic amigurumi supplies. The original tutorial uses Hobbii Honey Bunny yarn, which gives the bunny its plush texture.
Here’s what you’ll need:
- Yarn: Hobbii Honey Bunny (super bulky chenille yarn) in your preferred bunny color.
- Crochet hook: 6.5 mm.
- Safety eyes: 8 mm.
- Stuffing: Polyester fiberfill.
- Stitch markers: For tracking rounds and positioning the legs, arms, and ears.
- Tapestry needle: For closing the remaining openings and embroidering facial details.
- Scissors: For cutting yarn.
- Pink yarn: A small amount for embroidering the bunny’s nose.
Helpful tip: Chenille yarn can be delicate when tightening a magic ring. Pull the yarn tail gently as you work the first round to help prevent breakage.
Crochet Stitches and Abbreviations
Before starting your no-sew bunny, take a moment to familiarize yourself with the crochet abbreviations used throughout the pattern. All instructions follow US crochet terminology and are worked in continuous rounds unless otherwise noted.
| Abbreviation | Meaning |
| MR | Magic Ring |
| sc | Single Crochet |
| inc | Increase — work 2 single crochets into the same stitch |
| dec | Decrease — crochet 2 stitches together |
| ch | Chain |
| st | Stitch |
| sts | Stitches |
| R | Round |
How to read the pattern: Instructions in parentheses followed by a multiplier should be repeated the indicated number of times. For example, (2 sc, inc) × 2 means working two single crochets followed by an increase, then repeating that sequence once more.
The stitch count shown at the end of each round tells you how many stitches you should have after completing it.
Free No-Sew Bunny Crochet Pattern
Crochet the Bunny Ears (Make 2)
Start by crocheting two long bunny ears using your chenille yarn and a 6.5 mm crochet hook. Each ear is worked in continuous rounds, then flattened and closed with single crochet stitches.
Crochet Instructions
- R1: Work 5 sc into a magic ring. (5)
- R2: 2 sc, inc, 2 sc. (6)
- R3: (2 sc, inc) × 2. (8)
- R4: (3 sc, inc) × 2. (10)
- R5: (4 sc, inc) × 2. (12)
- R6–R9: Sc in each stitch around. (12)
- R10: (4 sc, dec) × 2. (10)
- R11–R13: Sc in each stitch around. (10)
- R14: (3 sc, dec) × 2. (8)
- R15–R17: Sc in each stitch around. (8)
- R18: 4 sc, dec × 2. (6)
- R19: Ch 1, flatten the ear, and work 3 sc through both layers to close the opening. (3)
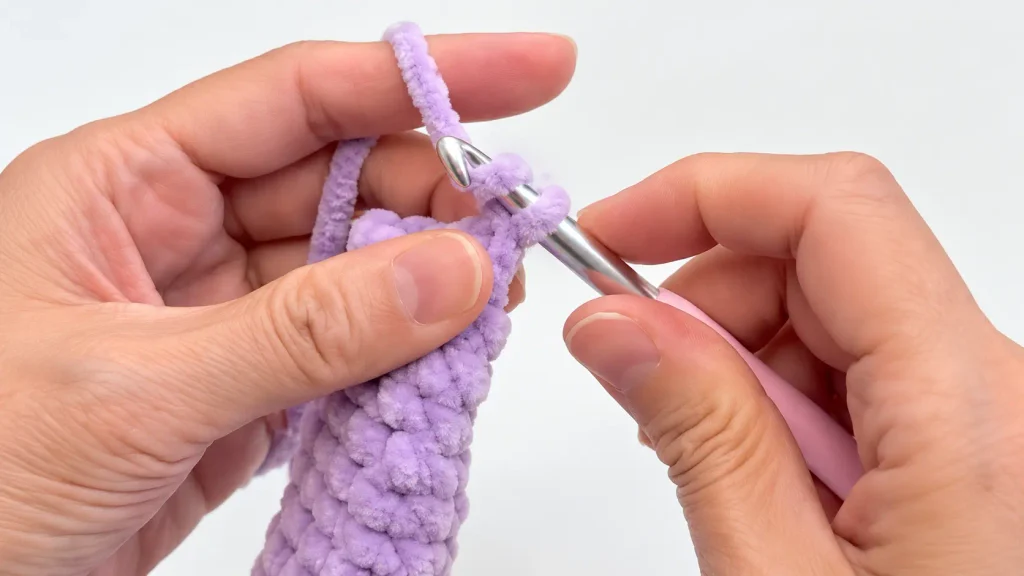
Fasten off and repeat the same instructions to make the second ear. Set both ears aside; you’ll attach them directly to the head later.
Ear-specific note: After Round 3, turn the ear so the right side of the stitches faces outward. The ears are flattened before closing; the tutorial does not instruct you to stuff them.
Make the Bunny Tail (Make 1)
The bunny’s small, rounded tail is crocheted separately and attached directly to the body as you work, keeping the assembly simple and minimizing sewing.
Crochet Instructions
- R1: Work 4 sc into a magic ring. (4)
- R2: Inc in each stitch around. (8)
- R3: (1 sc, inc) × 4. (12)
- R4: Sc in each stitch around. (12)
- R5: (1 sc, dec) × 4. (8)
- R6: Dec × 4. (4)
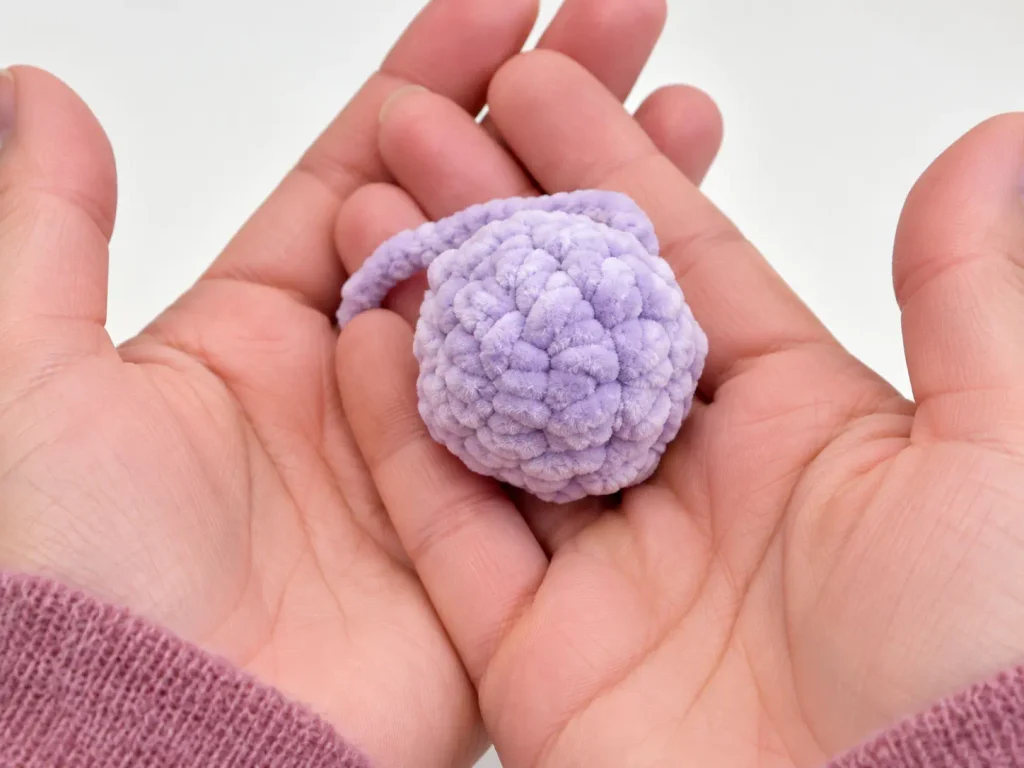
Fasten off and fill the tail with polyester fiberfill until it has a rounded shape. Set it aside for now; you’ll join it to the bunny’s body during the body rounds.
Tail-specific note: Keep the stuffed tail separate until the body rounds where it is joined.
Crochet the Front Legs (Make 2)
The bunny’s front legs are small and softly stuffed, giving the finished toy a cute, rounded appearance. You’ll crochet both legs separately before joining them directly to the body in a later round.
Crochet Instructions
- R1: Work 6 sc into a magic ring. (6)
- R2: (1 sc, inc) × 3. (9)
- R3–R5: Sc in each stitch around. (9)
- R6: Dec, 7 sc. (8)
- R7–R8: Sc in each stitch around. (8)
- R9: (2 sc, dec) × 2. (6)
- R10–R11: Sc in each stitch around. (6)
Add a small amount of polyester fiberfill to the bottom half of the leg, leaving the upper half soft and unstuffed. This will make it easier to join the leg to the body.
Fasten off and make a second front leg using the same instructions. Keep both pieces ready for attachment during the body section.
Front-leg check: Each leg should finish with 6 stitches. Compare the two pieces before joining them.
Crochet the Hind Legs (Make 2)
The bunny’s hind legs are slightly wider than its front legs, giving the finished plushie a soft, rounded shape. Crochet both hind legs separately, then attach them directly to the body using the join-as-you-go method.
Crochet Instructions
- R1: Work 6 sc into a magic ring. (6)
- R2: Inc in each stitch around. (12)
- R3–R5: Sc in each stitch around. (12)
- R6: 3 sc, dec, 2 sc, dec, 3 sc. (10)
- R7–R8: Sc in each stitch around. (10)
- R9: (3 sc, dec) × 2. (8)
- R10–R11: Sc in each stitch around. (8)
Add polyester fiberfill to the lower half of each hind leg, keeping the upper portion flexible for joining.
Fasten off and repeat the instructions to make the second hind leg. Set both legs aside until you’re ready to crochet the bunny’s body.
Hind-leg check: Round 6 includes 2 sc between the decreases. Each finished hind leg should have 8 stitches.
Crochet the Bunny Body and Join the Legs
Now it’s time to bring your bunny together! The body is crocheted from the bottom upward in continuous rounds. As you work, you’ll attach the hind legs, tail, and front legs directly to the body using the join-as-you-go technique.
Keep your stitch markers nearby. Accurate placement is especially important during the joining rounds.
Start the Body
- R1: Work 8 sc into a magic ring. (8)
- R2: Inc in each stitch around. (16)
- R3: (1 sc, inc) × 8. (24)
R4: Attach the Hind Legs
Before starting Round 4, place stitch markers in stitches 9, 12, 13, and 16 of the body. On each hind leg, mark stitches 1 and 4. Match the corresponding markers so both legs face the correct direction.
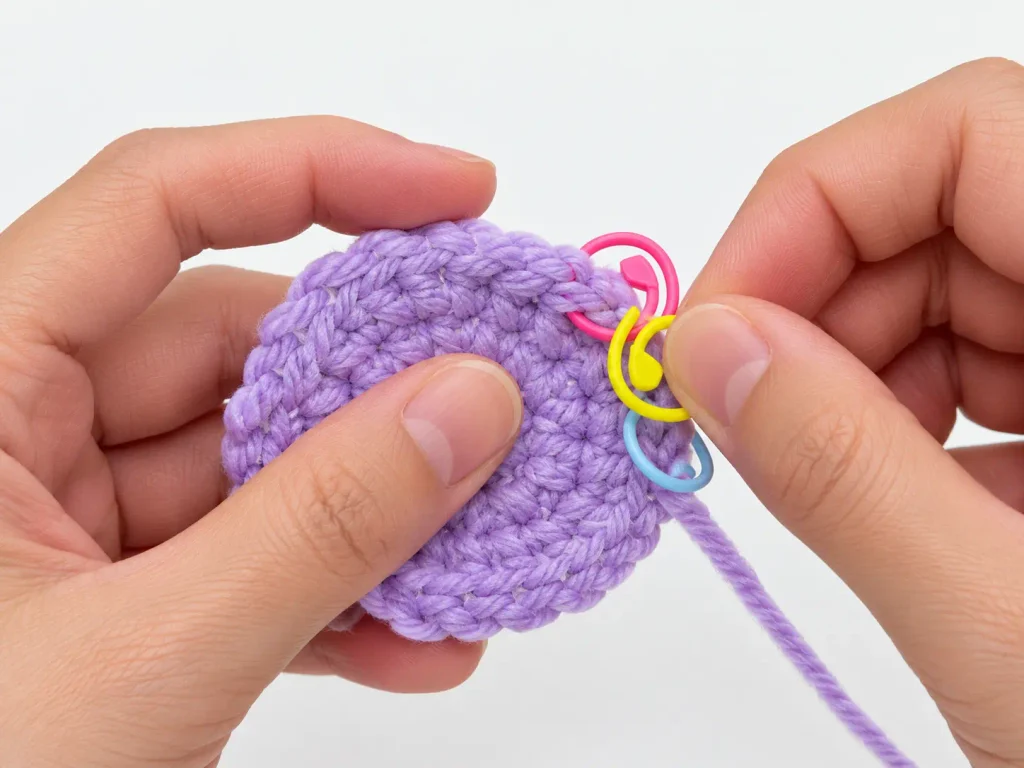
Work the following round:
- R4: (3 sc, inc) × 2, (3 sc, inc through the left hind leg and body), (inc, 3 sc through the right hind leg and body), (inc, 3 sc) × 2. (30)
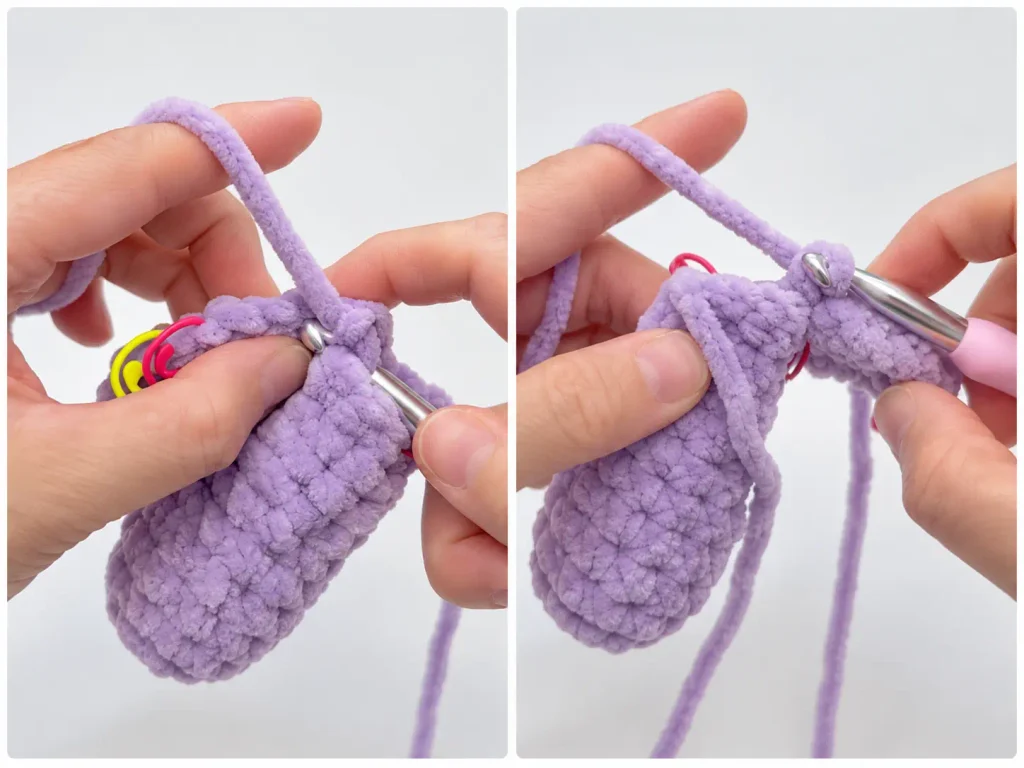
When joining each leg, insert your hook from the inside of the leg first, then through the corresponding stitch on the body. Complete the single crochet through both layers.
R5: Complete the Hind Leg Connections
The outer sides of the hind legs are still open after Round 4. You’ll work across those remaining stitches to complete the joins.
- R5: 10 sc on the body, 4 sc along the outer side of the left hind leg, 2 sc in the marked connecting stitches, 4 sc along the outer side of the right hind leg, 10 sc to finish the round. (30)
How to follow R5: After the first 10 body stitches, work across the four still-open outer stitches of the left hind leg. Crochet the two marked connecting stitches between the legs, then work across the four open outer stitches of the right hind leg. The final 10 body stitches include the marked stitch immediately after the right leg and the remaining nine body stitches. This explains the full total of 10 + 4 + 2 + 4 + 10 = 30. The transcript describes carrying the leg yarn tails along to tighten small gaps at the joins.
See the original video at approximately 30:11–32:36 if you need to check the stitch locations.
R6–R8: Attach the Bunny Tail
Position the stuffed tail at the back of the body.
- R6: 29 sc, then work 1 sc through both the tail and body to begin attaching the tail. (30)
- R7: Work 1 sc through the tail and body, 28 sc around the body, then 1 sc into the tail only. (30)
- R8: Work 1 sc into the tail only, skip the two body stitches used for the tail connection, then work 7 sc, dec, (8 sc, dec) × 2. (27)
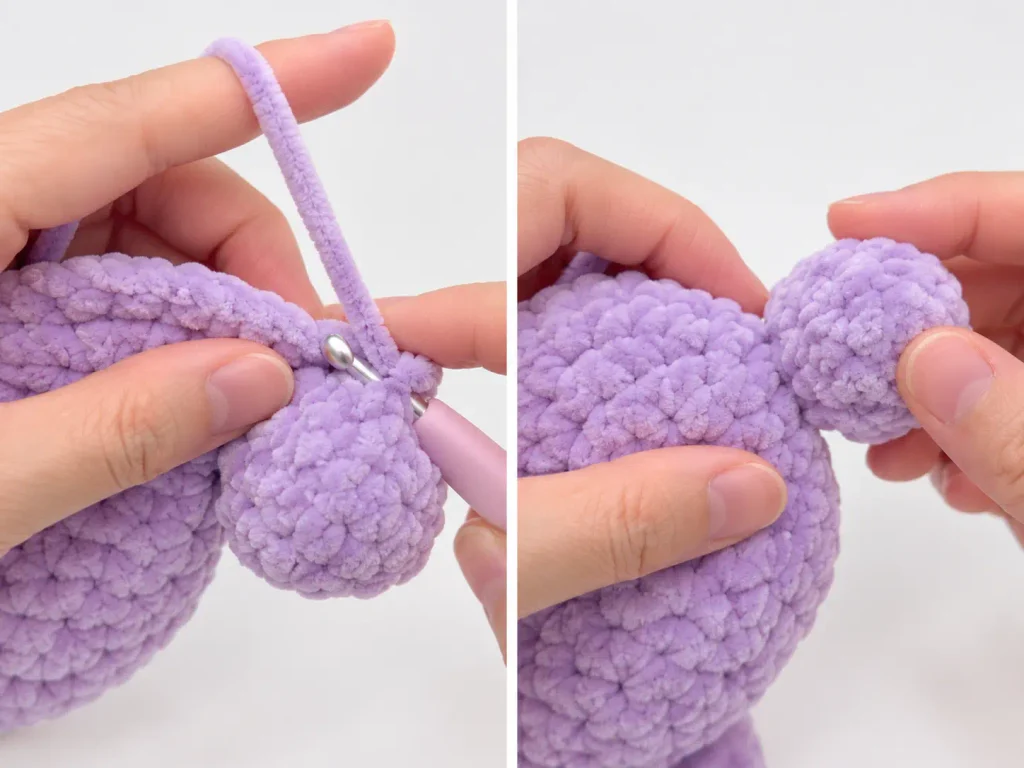
Important for R8: The first sc is made in the tail only. Then skip the two body stitches previously used to connect the tail and resume on the next available body stitch. Do not work into those skipped body stitches again. The written sequence produces 1 + 7 + 1 + (8 + 1) × 2 = 27 stitches. The creator demonstrates this transition at approximately 34:48–35:40.
Check that the tail is centered at the back before continuing.
R9–R13: Shape the Body
- R9–R10: Sc in each stitch around. (27)
- R11: (7 sc, dec) × 3. (24)
- R12: Sc in each stitch around. (24)
- R13: (4 sc, dec) × 4. (20)
Add fiberfill gradually to shape the body. Avoid overstuffing near the openings where the front legs will be attached.
R14: Attach the Front Legs
Before beginning Round 14, adjust the starting point with a few positioning stitches, if necessary, so the round begins at the center of the bunny’s back. These stitches shift the starting position; they do not increase the stitch count.
Place stitch markers in stitches 5, 7, 14, and 16 of the body. Mark stitches 1 and 3 on each front leg.
- R14: 4 sc, 3 sc through the left front leg and body, 6 sc on the body, 3 sc through the right front leg and body, 4 sc to finish. (20)
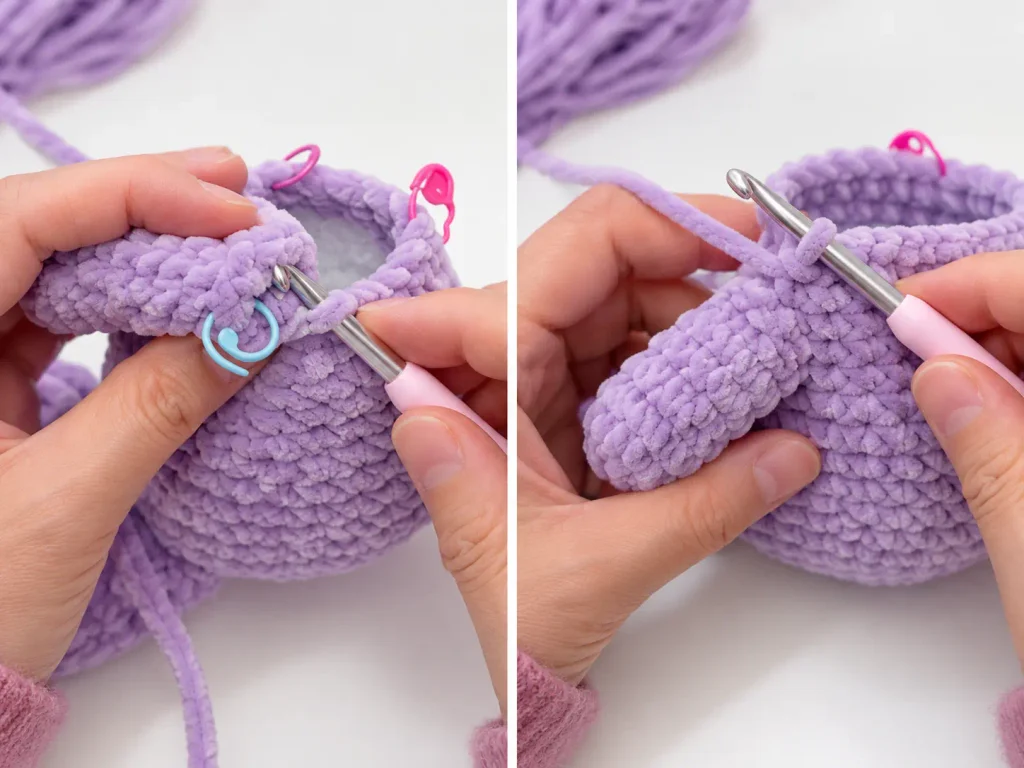
Insert your hook through the front leg first, then through the corresponding body stitch. Work the joining stitches through both layers.
R15–R16: Shape the Neck
- R15: Dec × 2, 3 sc along the left front leg, dec, 2 sc, dec, 3 sc along the right front leg, dec × 2. (14)
- R16: 1 sc, dec, 2 sc, dec × 2, 2 sc, dec, 1 sc. (10)
Continue directly into the head without fastening off.
Joining reminder: Match each leg’s markers to the corresponding body markers. Work through both layers for the indicated joining stitches; check stitch totals after R4, R8, R14, and R15. The original video can help clarify hook placement.
Crochet the Bunny Head and Attach the Ears
With the bunny’s body complete, continue crocheting directly into the head without cutting the working yarn. You’ll shape the chin, build the rounded head, and attach both ears as you work.
R17: Shape the Chin
Before starting the head, work a few positioning stitches if needed to bring your working point to the center of the bunny’s back. These stitches help align the chin at the front.
- R17: Inc × 5, ch 2, inc × 5. (22)
Chin stitch-count note: The 10 increases create 20 sc, and the creator counts the ch 2 as two additional chain stitches, giving 22 stitches/chain positions for this round. In R18, work one sc into each of those two chain stitches in the middle of the round; they are not skipped. This is a special shaping step, not a standard round of increases. Keep the chain section centered toward the front of the face (see 46:40–48:40 in the video).
R18–R22: Build the Head
- R18: (4 sc, inc) × 2, 2 sc into the chain stitches, (inc, 4 sc) × 2. (26)
- R19: (5 sc, inc) × 2, 2 sc, (inc, 5 sc) × 2. (30)
- R20–R22: Sc in each stitch around. (30)
Use a stitch marker to track the beginning of each round and keep the head shaping even.
R23–R24: Begin Shaping the Top
- R23: (8 sc, dec) × 3. (27)
- R24: (7 sc, dec) × 3. (24)
During R23, use a short piece of contrasting scrap yarn to help mark the intended eye area. You’ll use this reference when positioning the safety eyes later.
R25: Attach the Bunny Ears
Before joining the ears, adjust the starting point if necessary so you’re working from the center of the back of the head.
Place stitch markers at stitches 6, 8, 17, and 19 of the head to identify the ear attachment positions. Make sure the ears are positioned symmetrically before continuing.
- R25: 5 sc, 3 sc through the left ear and head, 8 sc, 3 sc through the right ear and head, 5 sc. (24)
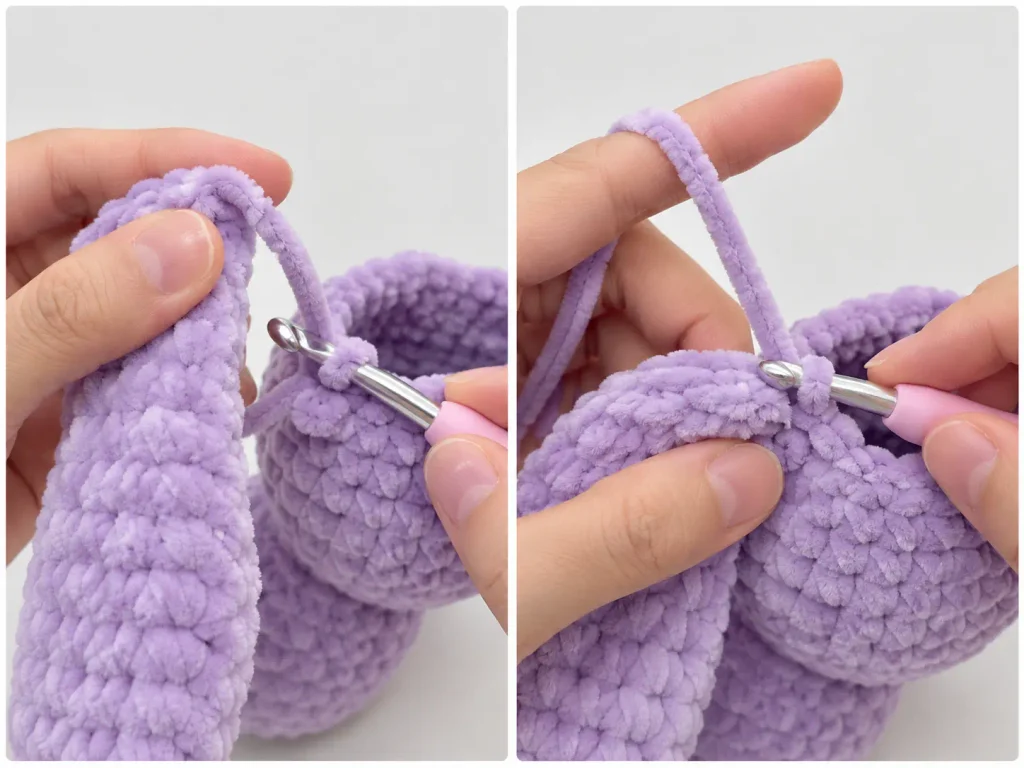
To attach each ear, insert your hook through the flattened ear first, then through the corresponding stitch on the head. Complete each single crochet through both layers.
Both ears are now attached without needing to sew them onto the finished bunny.
Add the Safety Eyes
Before closing the head, position the 8 mm safety eyes between R22 and R23, approximately 5 stitches apart.
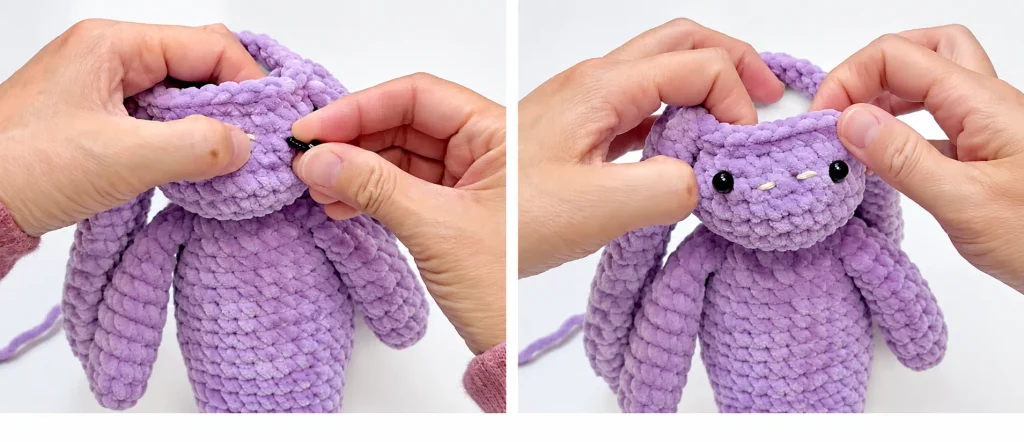
Use the scrap yarn marker as a guide, check that the eyes look even from the front, and secure them with their washers. Remove the scrap yarn afterward.
Add fiberfill gradually, shaping the head without overstuffing.
R26–R28: Close the Head
- R26: (2 sc, dec) × 6. (18)
- R27: (1 sc, dec) × 6. (12)
- R28: Dec × 6. (6)
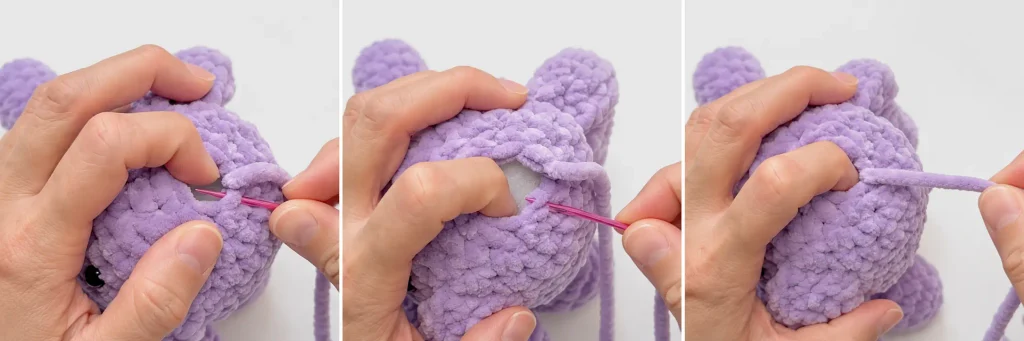
Add more stuffing before the final closure if needed.
Fasten off, leaving a yarn tail. Thread it through a tapestry needle and pass the needle through the front loops of the six remaining stitches. Pull gently to close the opening, secure the yarn, and hide the tail inside the bunny.
Head-shaping reminder: Center the chin before R17 and confirm ear alignment before R25. Check the eye spacing before securing the washers.
Add the Bunny’s Nose and Final Finishing Details
Your plush bunny is almost finished! With the ears and safety eyes in place, it’s time to add the final facial details and tidy up any remaining yarn ends.
Embroider the Bunny’s Nose
Thread a small piece of pink yarn through a tapestry needle. Position the nose in the center of the face, approximately one round below the eyes.
Carefully embroider a small nose, keeping it centered between the safety eyes. Adjust the stitches until you’re happy with the appearance, then secure the yarn and hide the ends inside the bunny.
Close Any Remaining Gaps
Check the chin area where you made the two chain stitches during Round 17. If a small opening remains, use the yarn tail and tapestry needle to close it neatly.
Make sure the opening at the top of the head is fully closed and that all loose yarn ends are secured and tucked inside the plushie.
Give Your Bunny Its Final Shape
Gently shape the head, body, ears, and legs with your hands. Check that the ears sit evenly and the tail is positioned at the back.
Your soft, cuddly no-sew crochet bunny is now complete!
Tips for a Neat Amigurumi Bunny
For a balanced finish, focus on a few details beyond the stitch counts.
- Keep the tension consistent. Even stitches help the two ears and pairs of legs match in shape, especially with plush yarn.
- Shape the stuffing, not just the surface. Spread small amounts of fiberfill evenly so the head and body stay rounded without feeling rigid.
- Check the silhouette. Before securing the eyes, look at the bunny from the front and both sides; small placement adjustments can change its expression.
- Finish with care. Center the embroidered nose, hide loose yarn ends, and gently shape the curved ears.
Common No-Sew Bunny Crochet Mistakes
If something looks off, check these likely causes before continuing.
- Your stitch count changes unexpectedly. Fluffy yarn can hide a stitch. Return to the round marker, recount, and undo the round if necessary.
- A leg twists during joining. The body and leg markers may not match. Check their positions before crocheting through both layers.
- The stuffing shows through. The piece may be overfilled. Remove a little fiberfill and redistribute the rest, leaving the upper legs soft.
- The yarn breaks at the magic ring. Chenille can be fragile under sudden tension. Tighten the starting ring gradually instead of pulling sharply.
- The ears sit off-center. Continuous rounds can shift the working position. Make the indicated positioning stitches before marking the ear attachment points.
No-Sew Bunny Crochet Pattern FAQs
Is this no-sew bunny amigurumi pattern beginner-friendly?
This bunny uses basic stitches such as single crochet, increases, and decreases. However, attaching the limbs and ears while crocheting requires careful stitch counting, so it’s best for confident beginners who are familiar with working in the round.
Is this bunny amigurumi pattern free?
Yes! This free bunny amigurumi pattern guide includes the materials, crochet instructions, and finishing tips you need to follow along. You can also watch the original video tutorial for a closer look at the joining techniques.
Do I need to sew the bunny’s pieces together?
No separate sewing is needed to attach the legs, tail, or ears. They’re joined directly as you crochet. However, you’ll still use a tapestry needle to close small openings and embroider the nose.
Can I use a different yarn for this crochet bunny?
Yes, but changing the yarn weight or hook size will affect the bunny’s finished size and texture. For a similar plush appearance, use a comparable super bulky chenille yarn and an appropriate hook.
How do I keep the bunny’s ears and legs symmetrical?
Count your stitches carefully and use the recommended stitch markers when attaching each piece. Before making the joining stitches, check that both sides are positioned evenly.
Is this amigurumi bunny crochet pattern suitable for making gifts?
Yes! A handmade bunny can be a lovely gift or seasonal decoration. If you’re making one for a young child, consider embroidering the eyes instead of using plastic safety eyes, which can pose a choking hazard.
More Free No-Sew Amigurumi Patterns
Loved making this adorable crochet bunny? There’s plenty more to explore!
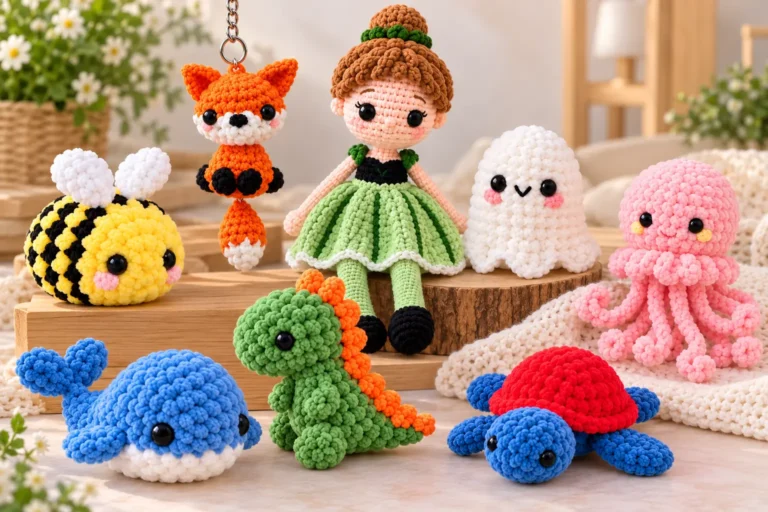
Discover our collection of 25 free no-sew amigurumi patterns featuring cute animals and creative crochet projects for your next handmade adventure. Whether you’re looking for another cuddly animal or a fun new project, you’ll find more inspiration to keep your.
One Comment